Make Your Own Blog - Part 2
By Matt Kinnersley - 24 January 2021
Setting up the project
Setting up a new NextJS project couldn't be easier. Creating a new app is as simple as yarn create next-app or npm create-next-app in your terminal (I'll be using yarn from now on). Once this has finished, start the project with yarn dev. On localhost:3000 , your app will be compiled and ready!
Deploying with Vercel
The first thing I like to do when creating a new project is getting it deployed as quickly as possible. This makes the whole process a lot smoother in the long run so you aren't having to deal with deployment issues all in one go at the end. Go ahead and make a new repository in GitHub and push your new project into it.
Next, go to Vercel and sign up with your GitHub account if you haven't done so already. If you signed up without your GitHub account, make sure you link it now. Once you have done this, hit New Project and follow the steps to import your NextJS app from GitHub.
At this stage, after it has set things up for you, you will be given a URL pointing at your app that's been deployed on Vercel servers! Anytime you push your changes to the main branch of your repository, it will deploy your code. Having continuous integration setup this quickly is the best part about using Vercel. A push of your code to any other branch will create a Preview Deployment. This is a deployment separate to your production app, perfect for testing features (and checking your blog posts).
Creating a template for your posts
Making a new page in NextJS is done by creating a new file in the pages directory. index.js becomes our homepage with the path /, about.js becomes /about and so forth. This is great but we don't want to have to manually create and style a new page for each blog post we write. Using Dynamic Routes from NextJS, we can create a template page where all our blog posts will live. All posts will inherit the styling of this page. To make our own Dynamic Route, create a new file under the pages directory and call it [slug].js. This is the way NextJS manages the routing of pages that have dynamically generated paths.
So what does the URL become for [slug].js?
In this file, we export a function that generates all the possible paths that 'slug' could become. This is how we can have all our blog posts rendering from one page and still have their own URL. The function we export must be called getStaticPaths and it must also return an array of all the paths we need. In our case, this will be the path of each blog post.
Here is an example from the NextJS docs:
// This function gets called at build time
export async function getStaticPaths() {
  // Call an external API endpoint to get posts
  const res = await fetch("https://.../posts");
  const posts = await res.json();

  // Get the paths we want to pre-render based on posts
  const paths = posts.map((post) => `/posts/${post.id}`);

  // We'll pre-render only these paths at build time.
  // { fallback: false } means other routes should 404.
  return { paths, fallback: false };
}
Where do we get our paths from then?
If we name our blog post files the same as what path we want it to have e.g. make-your-own-blog-part-1.md, we can use the fs (File System) module from Node.js to read all file names in the directory they are kept. You can see an example of this here:
export const getPostSlugs = () => {
  return fs
    .readdirSync("./path/to/your/posts")
    .map((slug) => slug.replace(/\.md$/, ""));
};
With this function, we get an array of all the paths for our blog posts. Using this in the getStaticPaths function gives us all our pages statically generated at build time.
Now that we have our page paths being generated for us dynamically, lets get some data to work with!
A common approach to writing markdown blog posts is to use front matter to create the metadata of our posts. This can include fields like title, author, timestamp etc. It looks like this:
---
title: "My New Post!"
subtitle: "Here is what this post is about"
date: "2021-01-01T00:00:00.000Z"
author: "Matt Kinnersley"
---
Below this front matter goes the content of the post. Write what you like for now, but include some header elements to play around with. Feel free to copy the following example:
---
title: "My First Post"
subtitle: "Here is my first post"
date: "2021-01-01T00:00:00.000Z"
author: "Your name"
---

# Title

## Subtitle

Some regular text.

Inline code:
`const x = 2`
To transform this markdown file into HTML, we can use a few libraries to help us. fs to read the contents of the file, gray-matter to read the front matter and remark to transform markdown to HTML. This works by parsing markdown into an abstract syntax tree (AST). You can then use other plugins in the unified collective to transform the syntax tree. This syntax tree then gets compiled back into text, or in our case, HTML.
Using these libraries, we can convert our markdown files into HTML which will be run whenever we build our site.
import fs from "fs";
import matter from "gray-matter";
import remark from "remark";
import html from "remark-html";

export const getPostBySlug = (slug) => {
  const fullPath = join(contentDir, `${slug}.md`);
  const fileContents = fs.readFileSync(fullPath, "utf8");
  const { data, content } = matter(fileContents);

  return { ...data, content, slug };
};

export default async function markdownToHtml(markdown) {
  const result = await remark().use(html).process(markdown);
  return result.toString();
}
To get this data into our new blog post page, we export another NextJS function from the file. This time called getStaticProps. Just like getStaticPaths, this will run at build time and supply our React components with the props they need.
export default function Post({ post }) {
  return (
    <>
      <article>
        <div>
          <h1>{post.title}</h1>
        </div>
        <div
          dangerouslySetInnerHTML={{ __html: post.htmlContent }}
        />
      </article>
    </>
  );
}

export async function getStaticProps({ params: { slug } }) {
  const post = getPostBySlug(slug);
  const htmlContent = await markdownToHtml(post.content || "");
  return {
    props: {
      post: {
        ...post
        htmlContent,
      },
    },
  };
}

export async function getStaticPaths() {
  // ...
}
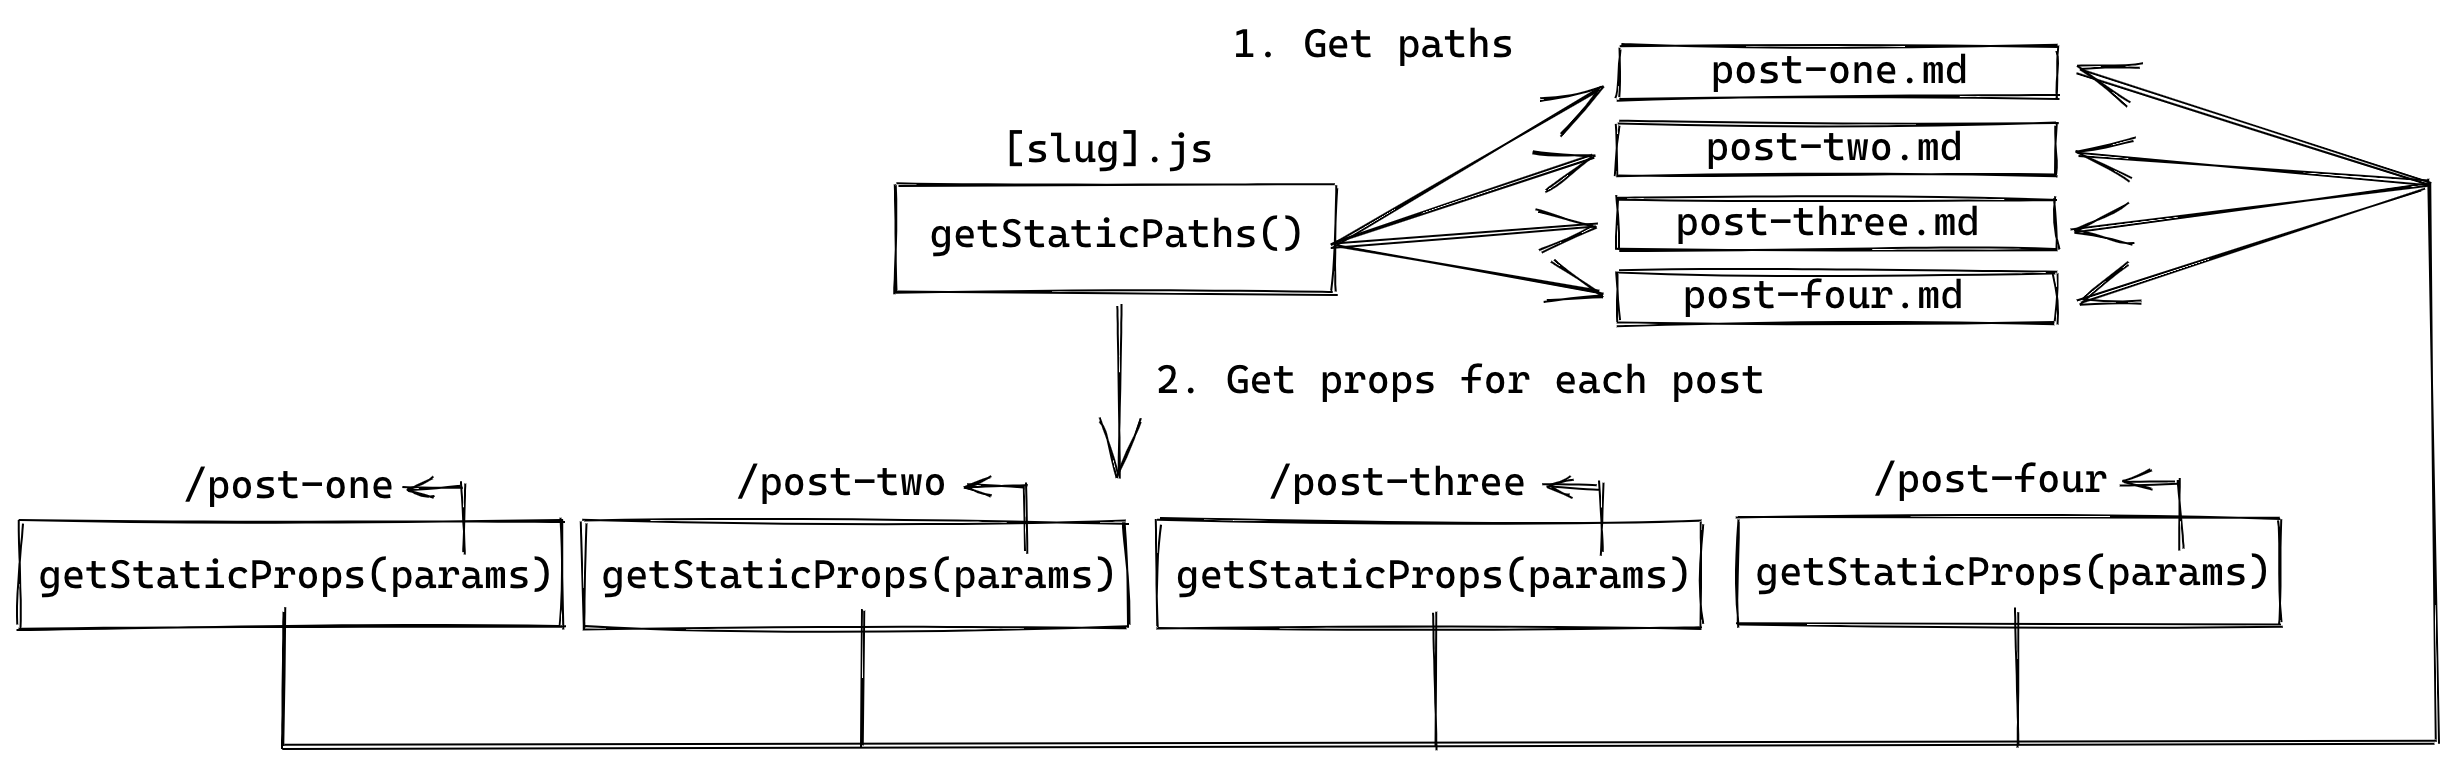
See how our React component takes the post prop? That is provided by out getStaticProps function at build time. This way, each of our pages that we dynamically generated earlier with their own unique path also get supplied with the correct post data. Another thing to notice is getStaticProps has a params: { slug } parameter. This is automatically provided by NextJS because [slug].js is what we named the file earlier. This means that at build time, slug becomes the slug of the post. Make sense? No? Don't worry, maybe this diagram will help.
It is important to remember this happens at build time so once this process has happened, it doesn't have to happen every time someone comes to your blog. It is turned into static HTML.
If we wanted to have our posts stored on a headless CMS, it would be the same process, except instead of transforming markdown files, it will be making an API call to your CMS to get the post data.
Go ahead and push your code to GitHub and watch Vercel deploy it for you. It's good to make a habit of frequent, atomic changes to your code to ensure you aren't forced to make a massive merge of your code when you want to deploy.
This is a good place to start styling your blog how you like. Feel free to also add any extra pages you want like an About or Contact page.
TailwindCSS
In this example I will be using TailwindCSS. As mentioned in Part 1 of this series, this is a nice utility framework that lets you combine multiple CSS classes to create your desired design. This means you don't have to worry about selector specificity when it comes to your styling because all classes are designed to be specific CSS properties.
Here's how you can go about setting up TailwindCSS in your NextJS application.
Install TailwindCSS and its dependencies.
yarn add tailwindcss@latest postcss@latest autoprefixer@latestCreate the configuration files.
npx tailwindcss init -pDelete the existing CSS module files and replace them with a global
index.css.Add the TailwindCSS directives to your new CSS file.
@tailwind base;
@tailwind components;
@tailwind utilities;
Create a custom
_app.jsfile in thepagesdirectory and fill it with this default code, making sure to also import your new CSS file.import "../styles/index.css"; function MyApp({ Component, pageProps }) { return <Component {...pageProps} />; } export default MyApp;All done! Now we can start using TailwindCSS in our code!
I'll leave the specific design up to you for your blog but here are a few pointers.
To create a consistent container around your pages use the
containerclass.<div class="container mx-auto"> <!-- ... --> </div>If you enable
darkModein yourtailwind.config.js, you can use thedark:prefix to enable styles only in dark mode.<!-- Dark mode enabled --> <html class="dark"> <body> <!-- Will be black --> <div class="bg-white dark:bg-black"> <!-- ... --> </div> </body> </html>To add custom styles in your CSS file, use
@apply..btn { @apply font-bold py-2 px-4 rounded; }
In the next part, I'll show you how to add a custom Mailchimp form and Google Analytics to help you track and engage your readers.